

Betty Draper’s hairstyle and the amazing hair and makeup team on Mad Men inspired this roller set. I was doing a photoshoot yesterday for an article I am writing about 1950s makeup for Vintage Made Magazine and I thought I’d share with you directions for the Betty Draper hairstyle.
Yes, I know that the show takes place starting in 1960, so why call this a 1950s hairstyle and not a 1960s hairstyle? One great detail that the creators of the characters did with Betty Draper was freeze her in time to a look from a couple years before, more late 1950s, showing that her character may be clinging to her younger years a little too much. Genius!
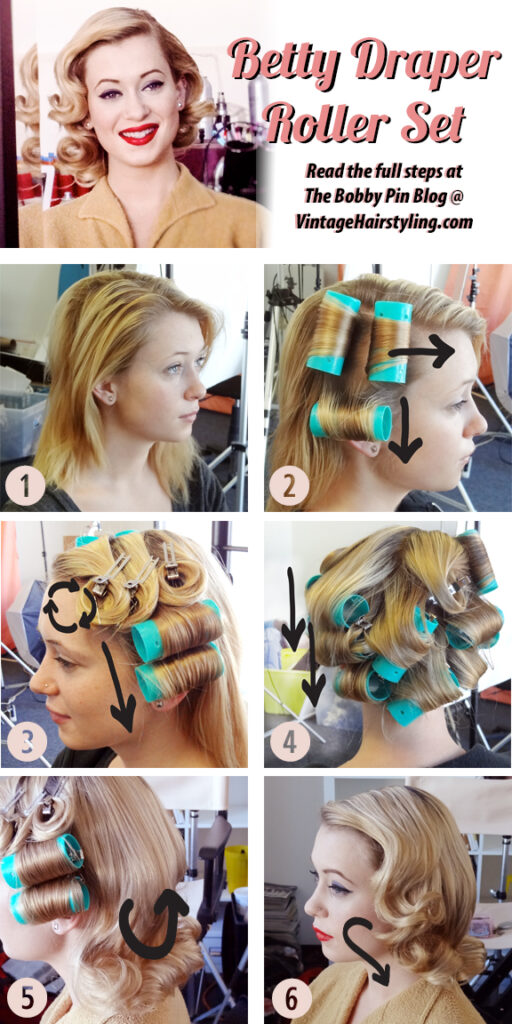
My model Victoria has shoulder length hair with a lot of layers in it. Although Betty Draper’s layers weren’t quite as short, the hairstyle still works as long as the length is close. Once it is curled, the curls sit right at the chin.
Spritz dry sections of hair 3 or 4 times with a setting lotion or hair setting foam. Using 1.25 inch magnetic rollers, roll the smaller side of hair. 2 rollers are turned perpendicular to the floor and rolled forward. 1 roller is rolled down toward the ear parallel to the floor.
Roll 2 sections just above the ear down toward the floor using the same spritz from step 2. Section the entire top of the head in 3 sections. You will need to use a little more setting product to roll these sections into large, uniform, clockwise pin curls. Look into the Roll & Go Hair Tool for help here if you need it.
Roll the entire back of the hair down parallel to the floor. Allow the hair to dry thoroughly. I’d suggest sitting under a hooded hair dryer for 15 minutes and then allowing the hair to cool, which I did for this set. But the hooded hairdryer isn’t completely necessary. You can also heat the rollers up a little with a diffuser attachment on a hand held hairdryer.
Take the back rollers out and brush the hair down and out to flip the hair out.
Take the rollers out first and brush the hair down and out. Then take the pin curls out last and brush that section together, up and over to the side.

You might also like: The Curler Caddy – A Vintage Beauty Organizer


12 Comments
DJ
I like your new website design, but by giving the logo and menu static placement so it does scroll up, it only gives a very small space in which to view the actual content of your blog.
LaurenR
What device are you reading the site on? It works fine on my iPhone. -Lauren
Beth
Same comment as DJ. I’m on a desktop.
LaurenR
I see what you’re saying if you are working on a smaller desktop screen. I’ll see if I can have anything done about that.
Bonnie
Love your new site too, but I’m having the same experience as DJ and Beth. (on Mac laptop) Also – I am not able to see all of the drop down menu, which might be related to the static header as well. For example, under decades I can only see up to the 1950s.
LaurenR
It is all fixed now. Things should be easier!
Chrystal
Hi Lauren, I bought your book and am a big fan of the blog – sitting here waiting for my Betty Draper roller set to dry as I type. I don’t have those rollers though and am only using pin-curl clips so I’m not expecting it to look as good as Victoria’s above. I’m a newb. when it comes to doing anything more than a ponytail – if you wouldn’t mind… What are those exactly, velcro rollers? What size are they?
LaurenR
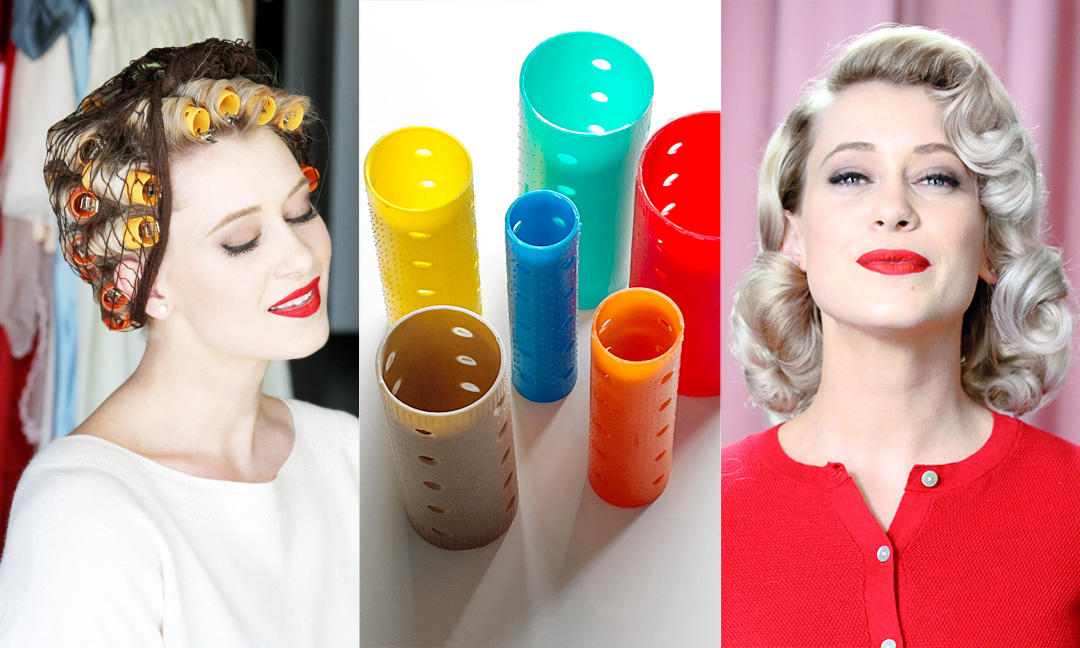
Hi Chrystal. The rollers are called magnetic rollers. They are a hard plastic instead of velcro and you use clips to hold them in place while they set. The size I used is 1 and 1/4 inch. Pin curls should work well too if you keep the curl large enough. Best of luck!
Tiffany
Would this work with wet hair and foam curlers?
LaurenR
Depending on how well your hair holds a wet set curl, it might end up a bit too curly, but you can certainly try it. I’d love to know how it turns out.
Jayne
Thanks so much for this fab tutorial – I found it via Pinterest (and actually did it!). I didn’t have any rollers so just did pin curls following the pattern, with a little mousse on dry hair overnight. It turned out perfectly and held all day, and I had so many comments on how nice my hair looked – one woman actually came into my train carriage just to say how nice it looked.
Thanks again for sharing this!
Jayne
Carmie
I keep coming back to this after getting my hair cut a little too short. I love this set and thank you for taking the time to make it!! The model is absolutely gorgeous.
I am doing makeup review on my blog later this evening, can I site this tutorial for how I did my hair??
–carmenmagnoliablog.com